How to set up or edit your email account - Windows
Please note: Some older email programs do not provide a checkbox for SMTP server authentication, so an upgrade to a newer version of the program may be necessary.
Outlook 2000
To Add a New Account Profile:
- Open Outlook
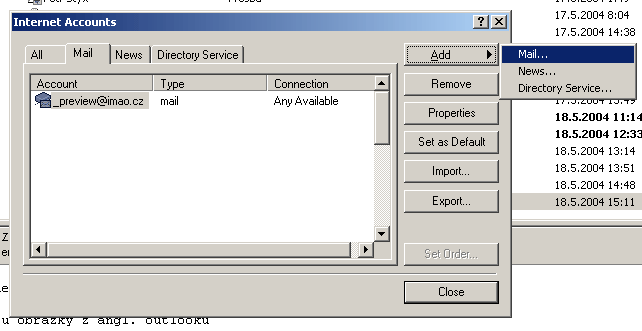
- Go to Tools
- Choose Accounts
- Select the Mail tab
- Click on Add
- Select Mail. This will open the Internet Connection Wizard.
- Enter your Name
- Click Next
- Enter your E-mail Address
- Click Next
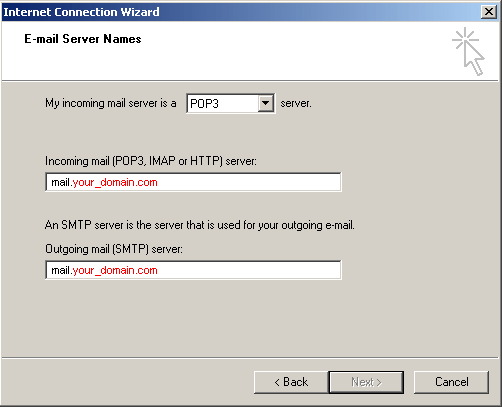
- Choose POP3 and enter mail.your_domain.com (your_domain.com - eg. google.com, mysite.com, ...) in the Incoming Mail (POP3) or (IMAP) server field.
- Enter mail.your_domain.com (your_domain.com - eg. google.com, mysite.com, ...) in the Outgoing Mail (SMTP) server field. (If you choose, you may enter your ISP's SMTP server information in this field instead.)
- Click Next
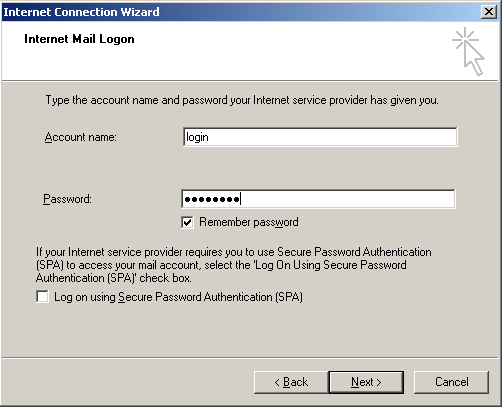
- Enter your login name in the Account Name field
- Enter your password in the Password field
- Choose the method your company uses to connect to the Internet.
- Click Next
- Click Finish, however if you are using mail.your_domain.com (your_domain.com - eg. google.com, mysite.com, ...) for your SMTP server it is necessary to follow these additional steps.
- Choose the account you have just created from the Internet Accounts window.
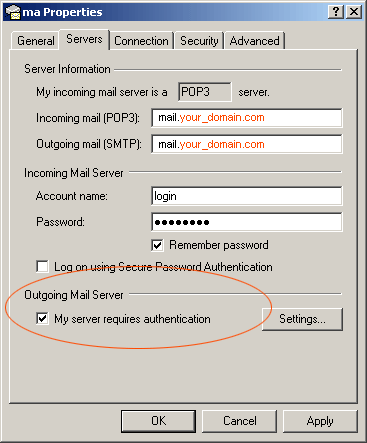
- Click on Properties
- Select the Servers tab
- Check the box for My Server Requires Authentication
- Click on the Settings button
- Select Use same settings as my incoming mail server.
- Click OK
- Click Apply
- Click OK
To Update an Account Profile:
- Open Outlook
- Go to Tools
- Choose Accounts
- Double click on the account you wish to update in the Internet Accounts window. This brings up Properties.
- Locate the tab which contains the information that needs to be edited, most often this will be General or Servers.
- Make corrections
- Click Apply
- Click OK
Outlook Express 6.0
To Add a New Account Profile:
- Open Outlook Express.
- Go to the Tools menu.
- Choose Accounts.

- Choose the Mail tab.
- Select Add to add an account profile.

- This opens Internet Connection Wizard
- Enter your Name.
- Click Next.
- Enter your E-mail Address.
- Click Next.
- Your incoming mail is a POP3 server.
- In the Incoming Mail (POP3, IMAP or HTTP) Server box, enter Enter mail.your_domain.com (your_domain.com - eg. google.com, mysite.com, ...).
- In the Outgoing Mail (SMTP) Server box, enter mail.your_domain.com (your_domain.com - eg. google.com, mysite.com, ...). (If you choose, you may enter your ISP's SMTP server information in this field instead.).

- In the Acount Name box, enter your login.
- In the Password box, enter your password.

- Click Next.
- Click Finish, however there are additional steps if you are using mail.your_domain.com (your_domain.com - eg. google.com, mysite.com, ...) for your SMTP server.
- Choose the account you have just created from the Internet Accounts window
- Click on Properties
- Select the Servers tab
- Check the box for My Server Requires Authentication

- Click on the Settings button
- Select Use same settings as my incoming mail server.
- Click OK
- Now choose the Connection tab in the Properties window.
- Check the box next to Always connect to this account using:
- Choose the method your company uses from the drop down list.
- Click Apply
- Click OK
To Update an Account Profile:
- Open Outlook Express
- Go to Tools
- Choose Accounts
- Double click on the account you wish to update in the Internet Accounts window. This brings up Properties.
- Locate the tab which contains the information that needs to be edited, most often this will be General or Servers.
- Make corrections
- Click Apply
- Click OK
Netscape 7
- Open Netscape.
- Open Mail & News Groups.
- Choose Mail & News Groups Account Settings.
- Choose Add Account. This will launch the Account Wizard.
- Select Email Account if it is not already selected.
- Click on the Right Arrow > button to continue.
- Enter Your Name and Email Address in the appropriate fields.
- Click on the Right Arrow > button to continue.
- Select POP if it has not been pre-selected.
- In the Incoming Server field enter mail.your_domain.com (your_domain.com - eg. google.com, mysite.com, ...).
- Click on the Right Arrow > button to continue.
- Enter your Account User Name (login) in the User Name field.
- Click on the Right Arrow > button to continue.This will bring you to the Congratulations! page, check the list to see that all your settings are correct.
- If any, except the Outgoing Server (SMTP) setting, are incorrect, use the < Left Arrow to go back and change them.
- Check the Outgoing Server (SMTP) setting, if it is not mail.your_domain.com (your_domain.com - eg. google.com, mysite.com, ...) or your ISP's SMTP server information, then there will be additional steps.
- When all settings above the Outgoing Server (SMTP) line are correct click on Finish to complete this step.
Changing the Outgoing Server (SMTP) setting in Netscape 7
- Open Mail & News Groups Account Settings if it is not already open.
- Locate Outgoing Server (SMTP) in the accounts list and click on it. To the right you will now see the settings for the default SMTP server.
- If this is not mail.your_domain.com (your_domain.com - eg. google.com, mysite.com, ...) or your ISP's SMTP server information, then click on the Advanced button to the right. This will open the Advanced Outgoing Server (SMTP) window.
- Click Add
- Under Server Name enter mail.your_domain.com (your_domain.com - eg. google.com, mysite.com, ...) (or your ISP's SMTP server information).
- The Use name and password box should be checked on if you are using mail.your_domain.com (your_domain.com - eg. google.com, mysite.com, ...) as you SMTP server.
- Enter your Account User Name (login) in the User Name field.
- Click OK to continue.
- Return to Mail & News Groups Account Settings
- Locate the name of the account you just set up in the list and click on it. This will bring up Account Settings to the right.
- Click on Advanced. This will bring up the Advanced Account Settings window with a list of the SMTP servers that have been created.
- Choose mail.your_domain.com (your_domain.com - eg. google.com, mysite.com, ...) (or your ISP's SMTP server information from the list.)
- Click OK
- If you wish this account and SMTP setting to be the Default Account, select it from the list to the left in the Mail & News Groups Account Settings window and click Set As Default.
- Click OK to finish.